


- Poor product visuals cost you sales, and 10 pro editing techniques can change browsers into buyers.
- Every platform plays by different rules, and a non-compliant image gets suppressed no matter how good it looks.
- Editing 500+ images a month in-house drains budget and resources. Find out when outsourcing makes better business sense.
Table of Contents
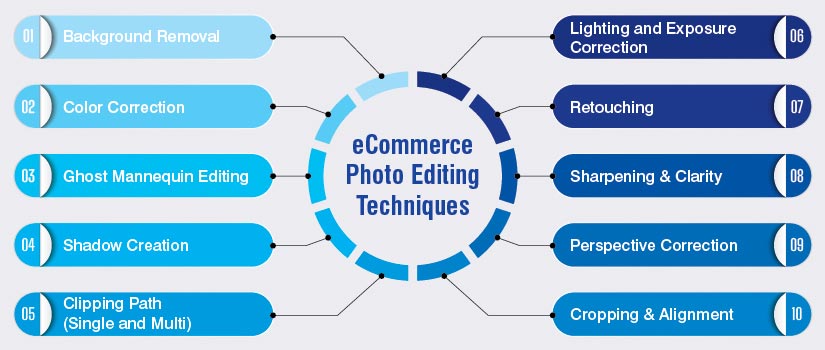
- 10 Professional Ecommerce Product Image Editing Techniques
- Background removal: Meeting Amazon, Shopify, and Etsy standards
- Color correction: How to prevent returns caused by color mismatch
- Ghost mannequin photo editing: The invisible mannequin (hollow 3-D) technique for apparel listings
- Shadow creation: Drop, cast, and reflection shadows
- Clipping path and multi-clipping path for color variant SKUs
- Lighting and exposure correction
- Retouching: Removing defects without misrepresenting the product
- Sharpening and clarity: Detail enhancement without haloing
- Perspective & lens distortion correction
- Cropping & Alignment
- How eCommerce brands can use product images to influence conversions and returns
- Ecommerce platform image requirements: Amazon, Shopify, Etsy, Walmart, and eBay
- In-House vs outsourced ecommerce image editing: Cost, volume, and turnaround criteria
- Frequently Asked Questions: eCommerce product image editing
- Conclusion
The ten core processes of eCommerce product image editing include background removal, color correction, ghost mannequin, clipping path, shadow creation, exposure correction, retouching, sharpening, perspective correction, and image cropping.
When all these processes are combined together, they provide product photos which will meet or exceed marketplace requirements, help create trust by visually representing product accurately and ultimately assist in converting browsers into paying customers.
This guide will cover the ten techniques of ecommerce product image editing in the order of use in a typical workflow, then outline the specification guidelines of the platforms that govern what images can be accepted into their marketplaces and lastly provide operational criteria to determine when to do the work in house versus outsource the work when producing product images at scale.
How eCommerce brands can use product images to influence conversions and returns
Product images are the only thing customers can interact with when shopping online. As such, if they are poorly lit, distorted in terms of color, or have distracting backgrounds; the shopper will bounce. More importantly, the potential sale will go to another brand’s listing which may be visually cleaner.
Downstream costs include not only missed conversions but also avoidable returns. Twenty-five percent of e-commerce sites product images are insufficient for users’ need to perform a visual exploration and product evaluation (Baymard Institute). In other words, a product may appear in a certain color when photographed versus what a customer expects when the product arrives at their door. This is a direct result of an editing error.
On the revenue side, multi-angle, well-edited image sets can increase conversions by up to 65%. Amazon’s CTR feeds into the A9 ranking algorithm directly. This basically means that there is a measurable way that image quality influences position in organic searches as well as on-page conversion. Consistency within your catalog also gives off a sense of operational reliability. Your customers utilize perceived image quality as a substitute for product quality.
Turn better visuals into better sales. Start optimizing today.
10 Professional Ecommerce Product Image Editing Techniques
High-quality product images are not optional – they directly influence how customers perceive, trust, and choose your products. The techniques below cover the essential edits needed to present your products clearly, accurately, and consistently, helping you reduce returns and improve conversions.
Background removal: Meeting Amazon, Shopify, and Etsy standards
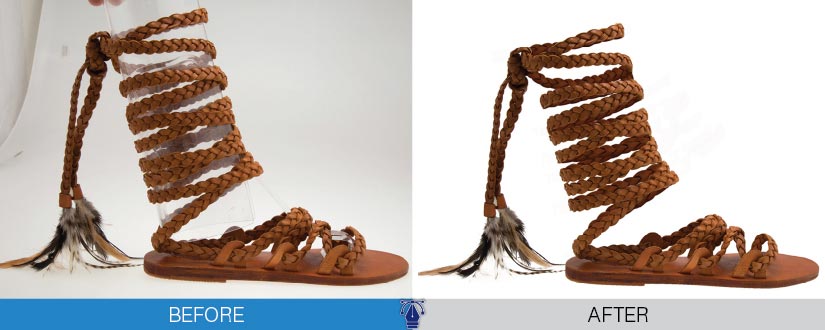
The process of product image background removal isolates the item from its background and adds an acceptable background as per e-commerce site (or the brand). In photo editing for online stores, removing the background is the very first phase. All subsequent processes such as creating shadows, correcting colors, and composite can only be done after product image background removal.
Product image optimization requirements set by platforms cannot be ignored. For example, Amazon and Walmart require all primary listing photos to be shot against a solid white background (RGB 255, 255, 255).
Secondary images on Shopify and Etsy may use lifestyle or contextually relevant background images; however, according to numerous studies, and controlled AB testing, using a white-background primary image always performs better than alternative background types.
There are three ways to remove the background depending upon the complexity of the product being photographed.
- Clip Path/ Pen Tool: This method is used for hard-edge items: shoes, electronics, glassware and packaging. Clip Paths provide sub-pixel accuracy and are required if the edited asset needs to go to print or be displayed at high magnification or need to be sent back to an agency.
- AI-based Removal: Adobe Firefly, Remove.bg, Clipping Magic provides quick and effective results for items with distinct silhouettes. However, these programs do require manual quality control on difficult-to-remove areas of the product: hair, fringe, mesh, and transparent materials.
- Color Range/Magic Wand: This method only works well if there is one consistent tone for the entire background. Both tools fail on products with shadows, gradations of tones, and any bleed from the product onto the background.
Following AI-removal of the background, open up the Select & Mask Workspace (Photoshop’s Refine Edge) to refine any difficult edges from the previous steps. Halos around objects that were once part of the background, and any remaining jagged cut outs or fringe are typically identified during this step. Any of the above-mentioned errors are viewed at full zoom and would result in a rejected image due to platform standards.
With the background removed accurately now begins the process of adjusting colors which becomes the second highest priority and the largest driver behind a 54% return rate making color correction the most commercially impactful tool in the workflow.
Color correction: How to prevent returns caused by color mismatch
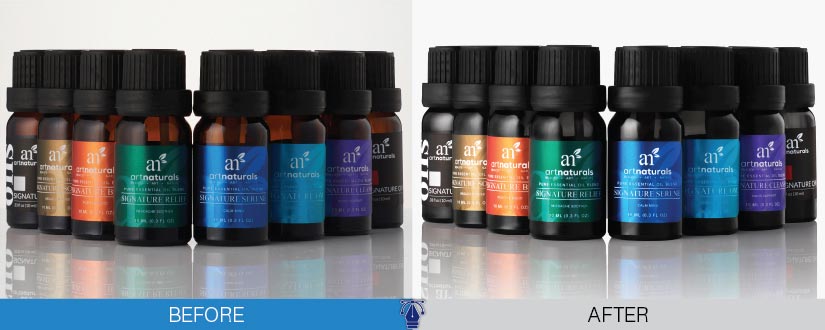
Color correction ensures that the colors of images are accurate when compared to the physical products they represent. The color correction process involves adjusting the Hue, Saturation, Luminance, and White Balance to ensure that the colors shown in the images accurately reflect those seen in person when illuminated with neutral light.
A correctly calibrated and hardware-profiled monitor (sRGB or AdobeRGB) is necessary for this process along with a carefully managed step-by-step process. It is not acceptable to simply make a global Hue/Saturation adjustment.
Steps one through four:
First Step
Set Neutral Reference Point
Use the Level’s Eyedropper Tool to capture a color from a known neutral object such as:
- White product label.
- A gray Card taken during the photo shoot.
- A white Background Reference.
Second Step
Apply Curves:
Independently adjust the highlight, midtone, and shadow areas using curves to increase the number of tonal levels within image while avoiding adding additional color cast to the area being adjusted.
Third Step
Use Selective Color (CMYK Sliders):
Individually adjust the color of objects within your image (without changing the surrounding tone) using CMYK sliders. For example, in the world of fashion and cosmetics a two-point adjustment in Cyan will turn a Cobalt into a Periwinkle and result in a color-mismatch which results in returns.
Fourth Step
Match Colors Between Variants:
Sample the color information from an approved Hero Image(s) and apply that color information to each of the Variant Images. This eliminates the need for individual correction of each variant image and allows to maintain consistent visuals throughout the entire color-swatches row on the product listing.
Do Not Over Saturate Products
While over saturation may be perceived as visually appealing, it often creates a perception that product image has been manipulated in flat product categories, and in some of the most trusted industries (jewelry, cosmetics, food etc.) can create negative reviews due to the fact that consumers trust what they see and want to buy based upon an accurate representation of what the product actually looks like.
Ghost mannequin photo editing: The invisible mannequin (hollow 3-D) technique for apparel listings
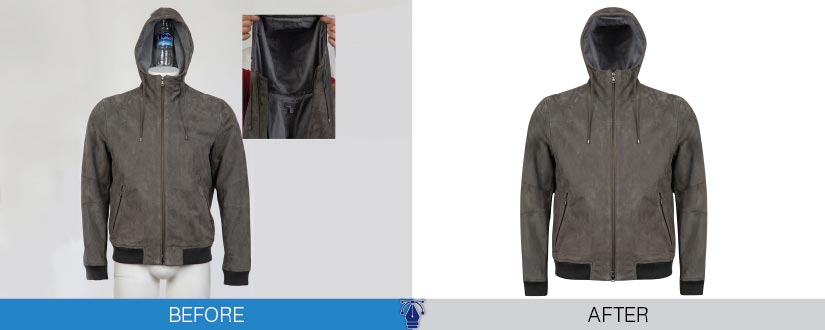
Ghost Mannequin photo editing is commonly referred to as “invisible mannequin” or “hollow man”. This method involves applying a post-production composite effect to remove the mannequin/model from the apparel photograph.
After removal, the resulting image depicts the garment as if it were standing alone in 3-dimensional shape. Thus, the viewer can see how well the garment fits, hangs, has a defined collar area and hem line behavior all this without the distraction of the mannequins/forms. Additionally, there is no need for each garment to have a live model photographed.
To accomplish this process, we require a minimum of 2 photos per garment; one exterior photo of the garment on a mannequin and another interior photo of either the neck area or a lining detail of the same garment. Once these photos have been layered in Adobe Photoshop, masks are applied to reveal the neck and hem areas of the outer garment.
Using frequency separation retouching techniques, inconsistencies (tonal steps-changes/edge artifacts) are eliminated that may be present at the composite junction caused by our previous actions.
This process is now common practice among most DTC (Direct-To-Consumer), Private Label Fashion Sellers, and Retailers that sell high SKUs (stock keeping units).
We here at Hitech Digital process approximately 2,000 to 3,500 apparel photographs daily for U.S. based retailers using a Rule-Based Workflow for processing Ghost Mannequins. Our documented error rate is less than .03% and our Standard Level of Service (SLA) is a 24-hour turnaround time.
For further information about this process, please review the case study.
Shadow creation: Drop, cast, and reflection shadows
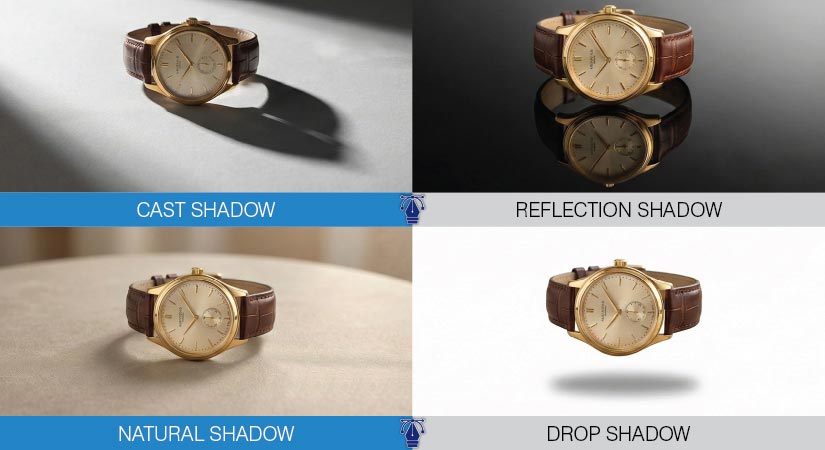
Products without shadows appear as if they are floating above the product image. This creates distrust in consumers to make purchasing decisions. Adding a drop or cast shadow to your images creates a visual connection to the product and provides consumers with the perception of an actual 3D product.
There are three different ways to create shadows for different uses:
- Drop Shadows (default for all product categories): A soft, faint shadow located under the product.
- Cast Shadows (standard for footwear, furniture and products shot at angles): A long, directional shadow that matches an identified non-directive light source.
- Reflection Shadows (used for glassware, ceramic products, polished metals and electronic devices with reflective surface): A vertical reflection of the product image that has been distorted, blurred and faded.
The only way to provide a realistic look to these three types of shadows is to ensure that the direction of each type of shadow corresponds with the direction of the lighting used in the photo shoot. Irregularity within catalog is a quality control issue; irregularities undermine the overall credibility of a catalog – not only individual photos.
Clipping path and multi-clipping path for color variant SKUs
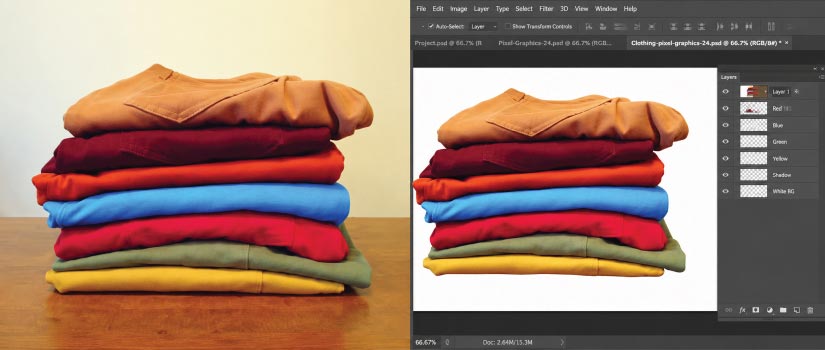
A clipping path is an image of a line defining a single, enclosed shape (vector), created in photoshop. The clipping path defines what portion of the image lies within the area defined by the path. All pixels lying outside of the clipping path are removed from the exported file; therefore, it is a technically accurate method for delivering files to ad agency, print vendors, or e-commerce sites that require products to have a clear border around them and no residual “background” artifacts.
The process of using multiple clipping paths allows you to assign a name to each separate clipping path for individual colors in your product. If you were working with a shoe with three different colors (white midsole, black bottom sole, blue top), you would create three separate clipping paths allowing you to isolate/swap/correct each of the colors individually without changing any other color.
This is how most online retailers manage their color-variant catalogues without having to reshoot each variation. It’s the only way to do so economically at scale.
From raw shots to revenue-ready visuals-your editing starts here.
Lighting and exposure correction
A good lighting and exposure adjustment is about maintaining your picture’s dynamic range. In other words, it involves keeping both the dark areas of your picture (shadows) and the lightest areas (highlights) from being clipped or lost. When you lose texture in a product image due to having blown out high lights, the consumer may miss important product characteristics when evaluating the product.
On the flip side, if you block up the shadows so that they do not appear as dark as they really are, you hide product features the customer will be looking at when deciding whether to buy the product.
Workflow:
- Adjust Black and White points in the levels tool, prior to adjusting any other tool, to expand the overall dynamic range of image.
- Use curves to adjust exposure by independently controlling each part of images’ tone scale. The subtle “S” curve provides a good amount of contrast while providing better output than using the Brightness / Contrast sliders globally.
- Dodge and Burn on a 10-15% opacity overlay layer to refine specific parts of image such as labeling text, hardware details and/or fabric weave textures.
- Use Camera Raw to recover blown-out highlights. RAW files provide 2-3 stops of recovery room whereas JPEGS have no recovery room.
Retouching: Removing defects without misrepresenting the product
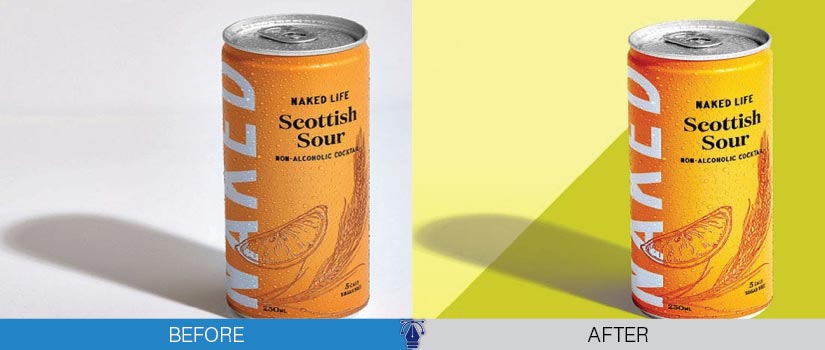
Editing: Removing Defects without misrepresenting the Product Editing (retouching) removes handling marks, fingerprints, dust, scratches and transit damage that occur from factory to photo studio. In no way can it be used to alter the products manufactured design, texture or structural elements. This is the greatest commercial constraint within the entire editing process. Select your tool based on the defect you are trying to correct:
- Spot healing brush – random surface markings on flat surfaces with a constant finish.
- Clone stamp – larger structural areas where there will need to be an exact replication of surrounding textures.
- Healing brush/patch tool – fabric wrinkles & packing creases. Preserve natural folds/drapes and only remove creases that were created due to shipping/handling.
Over-retouching – smoothing out intentionally textured materials, concealing structural seams/boundaries, lightening material grades — causes over half of returns (54%) as noted in section one. Often times the difference between the image being presented and the actual Product received is not a photography issue but rather an editorial decision which crossed into Product misrepresentation.
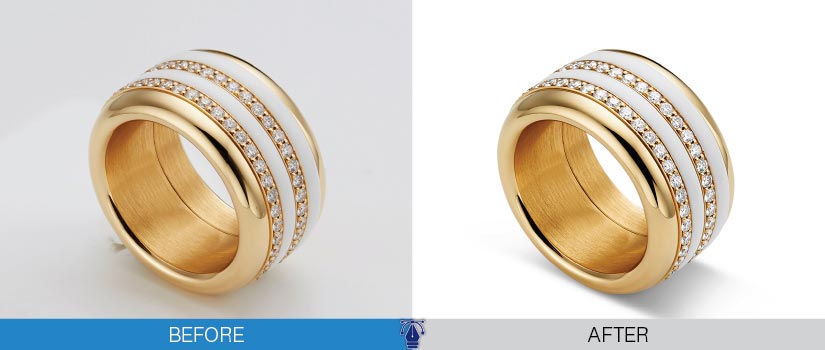
HitechDigital completed and retouched 50,000 images of jewelry for a pa brand improving brightness/contrast/color correction and removing all surface imperfections resulting in tangible improvements to their customer engagement/conversion metrics. View our jewelry editing case study.
Sharpening and clarity: Detail enhancement without haloing
High-pass sharpening should be used as the first choice for a non-destructive approach to sharpen an image. It can be achieved using the “high pass” filter with an empty duplicate layer in the top layer of stack. Set this top layer to either hard light or overlay, and you will have the ability to adjust the level of sharpening by adjusting the layer opacity. The high pass sharpening tool allows you to target high-contrast areas while avoiding the introduction of halos on flat, low-contrast surfaces.
You can improve clarity and sharpening in a product image but they are targeting two separate issues.
Clarity (midtone contrast) helps increase the visual depth perception of a surface. Sharpening helps define sharpness of edges. However, if you add too much clarity to a high-contrast area, it may produce halos similar to what excessive sharpening does. If there is no need to use clarity in a particular surface area due to damage to the detail, try to isolate and make local curves changes to the particular range(s) of tones.
Perspective & lens distortion correction
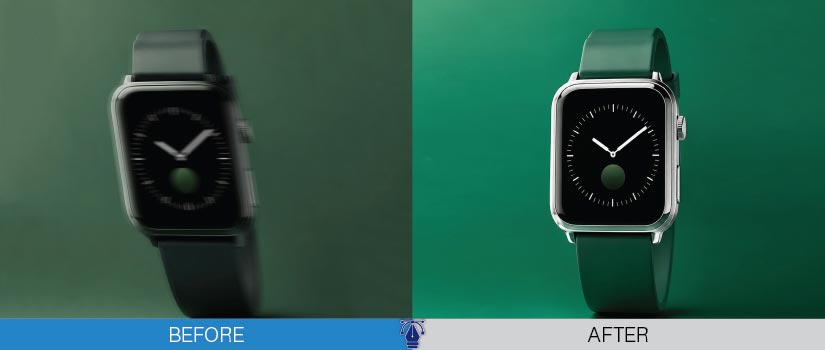
Keystoning (the product looks wider on top than it does on the bottom) can occur from perspective distortion. This happens because of how far away the camera sensor is from the subject (product), creating a non-parallel relationship between the two planes, thereby making the product look like it is widening down.
Keystoning will always happen if a macro set up is used and when the camera is placed directly above or below your products center line. Lens Correction Filter in Photoshop allows for either automatic corrections by utilizing built-in lens profile information, or manual adjustments through a grid-based system.
The Vanishing Point filter within Photoshop provides greater flexibility in terms of placing the convergence points for products with strong geometric lines (packaging, electronic components, furniture). GIMP uses the Perspective Tool and the Distort › Lens Distortion tool to accomplish similar tasks. There is no “correct” amount of correction regarding product geometry.
As long as all parallel edges look parallel after you have applied the corrections, you do not need to make additional corrections. Applying additional corrections will create a false flat perspective that many customers may view as having been manipulated photographically as opposed to being photographed.
Cropping & alignment
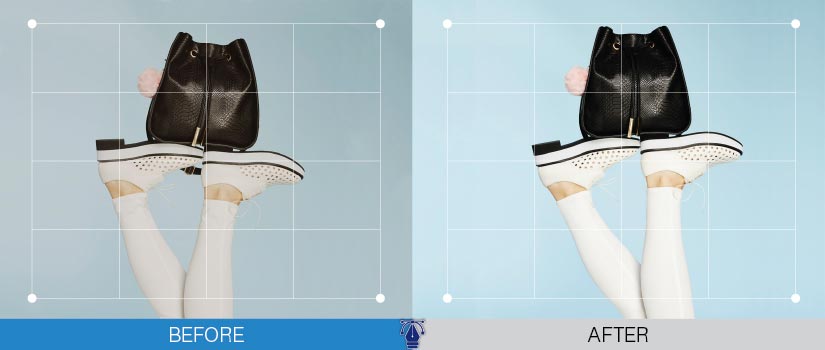
Alignment & Cropping help remove unnecessary dead space from your image subjects; alignment places your image subject at the same position inside a predetermined boundary on each SKU in your catalog.
How to do it
Determine the aspect ratio you want to use for all images before you begin the cropping process. The majority of e-commerce platforms (e.g., Amazon) have a 1:1 aspect ratio. Editorial/lifestyle images can use a variety of ratios such as 4:3 or 16:9. Once you determine this aspect ratio, perform a bulk crop operation for all images to ensure the ratio is locked throughout the entire catalog.
Align your product intentionally
Position your product intentionally based upon the type of shot you are creating:
- Hero shots → Center your subject. This allows the viewer’s eye to focus directly on the subject without being distracted.
- Lifestyle shots → Use the Rule of Thirds when positioning your subject. This will provide enough negative space for overlayed text, while still keeping the product visually prominent.
- Tall products (e.g., Bottles, Apparel on Hangers) → Align the bottom of the product with an internal guide so that variations in height are perceived as differences in product rather than poor photography.
Perform a quick check
A simple method to verify that all images have been aligned correctly is to quickly toggle through multiple images. If there are any inconsistencies in the size or position of one image compared to another, it becomes immediately apparent.
Tools to help with these tasks
- Lightroom → Sync Batch Crops
- Capture One → Precision Guides for Aligning Images
- Canva → Grid Template For Rapid Edits
- Bulk Image Crop → High Volume Catalogue SKU Processing
Why it matters
Inconsistent frames create “visual jumping” for customers who view multiple images of your product offerings in a row – essentially creating subtle friction that can kill confidence prior to reading your content. Uniformly cropped and aligned images signify professional quality and build subconscious trust that ultimately leads to increased conversions. Proper cropping also enhances mobile usability, strengthens catalog consistency, and keeps the shopper’s attention on the product versus distractions created by poorly framed images. Additionally, well-aligned product grids enhance the overall look and feel of your storefront and contribute to additional engagement opportunities and higher conversion rates.
Ecommerce platform image requirements: Amazon, Shopify, Etsy, Walmart, and eBay
The two different issues of how to edit product photos mainly editing technique and spec compliance are independent of one another. An edited image may meet all specifications for an e-commerce site but still be rejected due to spec compliance issues. Even if it is visually superior, an edited image that fails to comply with the specifications of a particular e-commerce site will be either rejected by the site administrator, suppressed by the site’s algorithms or will fail to convert algorithmically. Below are the main image requirements for each of the top five e-commerce sites.
Below you will find a summary of major image requirements for the top 5 platforms.
Amazon: The 1000 x 1000px size is a key boundary which enables zoom functionality. Although, the recommended 2000 x 2000px size is best for zoom capability. Amazon’s algorithms can also flag listings when the main image fails to meet the white background criteria.
Etsy: On Etsy lifestyle/ambient backgrounds generally beat white isolation shots because the target market for sellers on Etsy tend to view their purchase based on mood and ambiance rather than strictly clinical views of the product. In other words, edits for Etsy should emphasize environmental / ambient style shots and include very specific retouching instead of simply cutting a shot of product out against a completely white background in a studio setting.
Walmart: Walmart’s image processing pipeline will automatically detect and flag artificially created shadow effects and overly processed images as non-compliant. Therefore, creating shadow effect for listing purposes requires realistic effects.
Shopify: Shopify has a maximum file-size upload of 20MB, allowing brands to store 4K images. The recommended resolution of 2048 x 2048px is required for all brands selling high-consideration items where zoom quality is a factor in conversion rates.
Scale your product catalog without scaling your workload.
In-House vs outsourced ecommerce image editing: Cost, volume, and turnaround criteria
The real decision about who will edit ecommerce images is based on three things: how much you need to pay, how many images you plan to have edited, and how quickly you want them back.
When in-house editing makes sense
It’s ideal for small quantities (less than 200 images/month), when there needs to be close collaboration with the photographer or other team members during postproduction, or if the edits have to match closely with the original shot. The most common configuration will include; Adobe Photoshop CC, Lightroom Classic, and Adobe Bridge and cost around $600-$800 annually per person.
When outsourcing product photo editing is the correct decision
What constitutes a viable reason to outsource: When there are more than 500 images per month that need to be edited, in-house product image editing costs will exceed those of an outsourced service provider per image. This will include all calculating all in-house editing costs like salaries for employees, software costs, time lost due to QA testing, time spent reworking images that do not meet expectations, and time lost due to delayed image deliveries.
In other words, it’s not about what the software costs per month as compared to how much it costs per image to edit using an outsourced service provider, but rather how many people you employ versus how many high-quality product images, approved-for-usage images they provide you.
The rates charged by outsourced service providers
- Remove background: $0.39-$1.00
- Fully retouched (including shadow and color correcting) $1.50-$5.00 based upon the level of difficulty or the number of items being retouched.
Specialization of technique is the second determining factor. Ghost mannequin, frequency separation, multi-clipping paths and other techniques require a minimum of six months to learn proficiently. Because outsourced teams use specialized personnel; therefore, they produce significantly better results for difficult or complicated tasks.
The final determining factor is turnaround time. A team of outsourced professionals can generate up to 2,000 images per day and include QA approval so that product catalogs can launch, and campaigns can begin on schedule.
The Hybrid Model
A hybrid model is best for brands that manage two things at once; the volume of products in their catalogue and creative campaigns.
Brand input is required on hero images and campaign work and therefore should be done by an in-house team. High-volume, standardized SKU editing can be managed by outsourced teams.
HitechDigital uses a hybrid model using rule-based workflows and technique-specialist teams. Style guides are provided to each client defining the parameters such as background RGB, shadow opacity, sharpening, resolution & file naming so they receive consistent, auditable output from all images.
Frequently Asked Questions: eCommerce product image editing
What is the best image format for ecommerce product photos?
The most common format for product image editing for ecommerce is JPEG. This format has the perfect combination of quality and file size. When you need to use a transparent layer (cut-out) or layers that are placed over one another (overlays), PNG is your choice.
If you want a picture that will load quickly and compress the best possible amount of data (superior compression and speed of download), choose webp. However, if there are other users who might not support webp, then it would be good to add a fallback option of JPEG.
What size should product images be for Amazon?
Product images uploaded to Amazon must be at least 1000 x 1000px, so they will allow you to see them clearly once you click on the image. Amazon recommends making at least 2000 x 2000px for even clearer pictures. Your main Product image must always have a solid white background. Any secondary images you upload may contain anything else: lifestyle images, infographics, or detailed information about the product.
What is ghost mannequin editing?
Ghost mannequin photo editing is when we remove the mannequin from clothing images so that they appear three dimensional and show how the garment fits and what it looks like inside. We combine two separate images together to make this happen.
We do not use live models because it creates a cleaner image for potential buyers.
How much does professional product photo editing cost?
Typically, basic background removal starts at around $0.39-$1.00 per image. Basic retouching (Color correction & creating shadows) can start at $1.50-$5.00 based on how many images you edit, etc. The lower price point will occur with larger volume orders.
How do I remove a background from product photos without Photoshop?
Yes, you can! AI tools like remove.bg, Canva, and Clipping Magic automatically remove backgrounds from Product images. They do not require manual editing and are great for removing the simplest backgrounds.
Although these programs are easier to use than manual editing software, their accuracy is limited compared to those products. Their lack of precision makes them less useful when dealing with items that have intricate or thin lines such as hair, transparent objects, fine textures, etc.
Conclusion
The quality of the images created is what produces revenue. All ten techniques included in the guide include all aspects of the post-production process, and each of them will map back to an increase or decrease in conversion/return rates. Whether a well-edited picture is accepted by the platform or whether it is rejected or “suppressed” by an algorithm will be based on the specifications of the platform. Volume is what dictates if production should occur in house or outsource.