

- Automating clash detection with BIM transforms design coordination by identifying and resolving conflicts early, saving time, costs, and effort.
- Tools like Revit and Navisworks streamline the process, ensuring MEP systems integrate seamlessly with architectural and structural designs.
- By combining technology and human expertise, BIM not only enhances efficiency, but also fosters collaboration, leading to smarter, conflict-free construction projects.
Table of Contents
- How does BIM automate clash detection?
- Why should you care about automating clash detection
- BIM automation tools for clash detection
- The BIM-enabled clash detection process: A step-by-step guide
- Clash prevention through BIM automation: Proactive design
- The benefits of clash avoidance
- The human element: Bridging technology and expertise
If you’re an MEP consultant, you’ve seen it all: pipes crisscrossing with ducts, electrical conduits clashing with beams and HVAC systems squeezing into spaces they were never meant for.
These clashes might seem small on paper, but on site? They’re a nightmare.
According to studies, 30% of construction projects face rework due to design clashes, costing construction companies millions of dollars and weeks of wasted time. A single conflict can snowball into rescheduling labor, reordering materials, and tearing apart installations. When you’re on tight deadlines and budgets, you can’t afford that.
So, what’s the solution? Automating clash detection in BIM.
MEP BIM automation doesn’t just give you a fancy 3D model of your project. It automates clash detection, making it a game changer for MEP systems. By running smart algorithms across your MEP design, BIM flags issues like ducts colliding with beams or clearance zones being ignored—well before anyone sets foot on the construction site.
This isn’t just about spotting problems; it’s about preventing them altogether. And when you automate clash detection, you’re not just saving money; you’re saving yourself from endless headaches.
We’ll break this down for you. How BIM does it. Why is it critical for your projects. And what tools can you use to ensure MEP quality control.
How does BIM automate clash detection?
Imagine this: You’re working on a massive office project. The MEP systems—pipes, ducts, cables—are spread across dozens of floors, squeezed into tight spaces. Now, add structural beams, walls and ceilings into the mix. It’s chaos waiting to happen.
This is where BIM’s clash detection automation comes in. It acts like a super-efficient coordinator, identifying conflicts long before they turn into on-site disasters.
Here’s how it works, step-by-step:
1. Bring all models together
First, you pull in all the models—architectural, structural and MEP—into a single digital environment called a federated BIM model. Think of it as creating one big team meeting where everyone (or every system) can “see” each other.
Why does this matter?
Most clashes happen when systems are designed in silos. Bringing everything together ensures you’re catching those awkward overlaps early.
2. Set the clash detection rules
Here’s where magic starts. You tell the software exactly what to look for.
- Minimum clearances between pipes and ducts
- Safety zones around electrical conduits
- Spatial rules to ensure maintenance access
For example, you can set a rule that no two systems can come within 50 mm of each other. The software takes over from there, acting like a referee that flags any violations.
3. Run the clash detection
Now you hit “go,” and tools like Autodesk Navisworks or Revit go to work. They scan the entire model and systematically identify the following:
- Hard clashes: Physical overlaps, like a duct cutting through a beam.
- Soft clashes: Near misses, like a pipe running too close to an electrical panel.
The process isn’t just quick; it’s thorough. What would’ve taken you days of manual checking gets done in minutes.
4. Visualize and fix
Here’s the part that makes your life easier: The software generates clear visuals—think color-coded clash markers—that show exactly where the issues are.
You get:
- A list of clash locations
- Details of what’s clashing (like “duct A” vs. “beam B”)
- Tools to prioritize critical clashes first
So, instead of staring at complex drawings, you know where the problems are and can focus on fixing them.
Why should you care about automating clash detection?
Fixing design clashes during construction isn’t just a hassle—it’s a budget buster. But with automated clash detection, you can nip these issues in the bud.
Here’s why it’s a game-changer for you:
Save Time
Manual reviews of drawings are time-consuming. Automating quality checks in MEP accelerates this process, turning days of work into hours. In fact, adopting MEP BIM automation can help architects, engineers and MEP consultants save up to 70% of construction rework caused by design and engineering errors.
Save Costs
Fewer design errors mean fewer on-site surprises. By identifying and resolving clashes early, you avoid the expenses of tearing out and reinstalling components. This proactive approach can lead to significant cost savings throughout the project lifecycle.
Deliver Higher Accuracy
Automated tools systematically check every element of your MEP system, reducing human error and ensuring precise installations. This leads to higher geometric accuracy and installation precision for all building elements.
Collaborate Better
BIM fosters collaboration by allowing architects, structural engineers and MEP consultants to work together in a shared model. When clashes are detected, everyone can see the issues and resolve them efficiently, enhancing overall project coordination.
Using automated validation in MEP BIM models isn’t just about avoiding headaches; it’s about delivering projects on time, within budget, and with superior quality.

BIM automation tools for clash detection
Let’s explore some of the leading tools that are reshaping how we approach this critical task.
Autodesk Revit: The industry staple
Autodesk Revit has long been a cornerstone tool in the industry, renowned for its robust modeling capabilities. Its built-in clash detection features allow you to identify conflicts within the Revit environment, streamlining the design process.
Example in Practice:
Imagine you’re designing the MEP systems for a multistory office building. Using Revit’s clash detection, you can:
- Identify conflicts early: Detect issues like a ventilation duct intersecting with structural beams during the design phase.
- Resolve within the platform: Make necessary adjustments directly in Revit, ensuring a seamless workflow.
Autodesk Navisworks: The heavyweight champion
For more complex projects, Autodesk Navisworks offers advanced clash detection capabilities. It allows you to import models from various software platforms, aggregate them, and perform comprehensive analyses. Navisworks can handle large datasets, making it invaluable for large-scale projects.
Example in Practice:
Consider a large-scale hospital project involving multiple disciplines. With Navisworks, you can:
- Aggregate diverse models: Combine architectural, structural, and MEP models into a single federated model.
- Perform advanced clash detection: Identify complex clashes, such as electrical conduits conflicting with medical gas lines, ensuring all systems are coordinated.
- Generate detailed reports: Produce comprehensive clash reports that can be shared with the project team for efficient resolution.
Choosing the right tool for your project
Selecting the appropriate tool depends on your project’s complexity and specific needs:
- For integrated design and modeling: Revit’s built-in clash detection is suitable for projects where design and modeling are conducted within the same platform.
- For complex, large-scale projects: Navisworks is ideal for projects requiring the integration of models from various disciplines and software platforms.
By leveraging these BIM automation tools, you can enhance efficiency, reduce errors, and ensure successful project outcomes.
The BIM-enabled clash detection process: A step-by-step guide
Clash detection might sound technical (and it is), but when you follow the process step by step, it’s like having a well-oiled machine that keeps everything running smoothly.
Here’s how BIM ensures MEP model quality and turns chaos into a streamlined, conflict-free workflow.
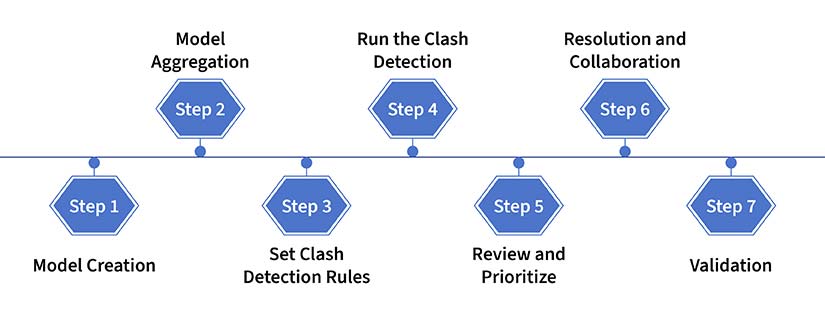
Step 1: Model Creation
Each team—architectural, structural, and MEP—creates their detailed 3D models using their preferred BIM software, like Revit or AutoCAD MEP.
Think of it as each player putting together their part of the puzzle.
But here’s the thing: the pieces need to fit perfectly later. Accuracy here is non-negotiable because even a minor mistake (like an incorrectly placed pipe) can lead to major clashes.
Step 2: Model Aggregation
Now comes the integration part. All these individual models are pulled into a federated BIM model using tools like Autodesk Navisworks.
This is where you see the whole picture—every duct, beam and conduit—in one place. If architectural, structural and MEP systems were musicians, think of this as getting them into the same room to ensure their notes don’t clash.
Step 3: Set Clash Detection Rules
You don’t want the software to cry “clash!” over every minor detail. So you define the rules:
- What types of clashes to flag (hard clashes, soft clashes, workflow issues).
- Acceptable tolerances—like a 50 mm clearance between a duct and a beam or specific maintenance zones for HVAC systems.
The software doesn’t assume anything; you tell it what to look for.
Step 4: Run the Clash Detection
Now, it’s showtime. You hit “run,” and tools like Navisworks or Revit take over. The software scans the federated model with laser precision and identifies:
- Hard clashes: Where components physically collide, like a duct piercing through a beam.
- Soft clashes: Near misses, like a pipe running too close to electrical cables.
What’s impressive here? The software does this in minutes—something that would take humans days to catch.
Step 5: Review and Prioritize
Here’s where it gets practical. Not all clashes are created equal. A minor soft clash might be harmless but a hard clash involving structural elements? That’s a red flag.
- The software generates reports and visuals.
- You prioritize issues based on severity (critical clashes first) and their potential impact on timeline and budgets.
So, instead of drowning in irrelevant warnings, you focus on what matters most.
Step 6: Resolution and Collaboration
Clashes are flagged; priorities are set—now it’s time to fix them.
- Teams (architects, structural engineers and MEP consultants) work together to resolve conflicts.
- Coordination meetings or cloud-based platforms like BIM 360 ensure that everyone’s on the same page.
For example, if an HVAC duct clashes with a beam, the structural engineer and MEP designer can tweak their models collaboratively, ensuring the fix works for both.
Step 7: Validation
Once the adjustments are made, you don’t just call it a day. You rerun the clash detection to double-check everything.
If the model passes this round, you’re good to go—conflict free and ready for construction. If not, repeat the process until every issue is resolved.
Clash prevention through BIM automation: Proactive design
It’s one thing to detect clashes; it’s another to prevent them altogether. With Building Information Modeling (BIM), you can embed intelligence into your designs, ensuring that conflicts are avoided from the get-go.
Proactive Design with Intelligent Components
By utilizing parametric components and smart objects in your BIM models, you set predefined behaviors and relationships. This means elements automatically adjust to design changes, maintaining harmony within the model.
Automatic Clearance Zones
Imagine setting up automatic clearance zones around structural elements. This ensures that other components do not encroach into designated spaces, effectively preventing clashes before they occur.
Dynamic Routing for MEP Systems
Consider implementing rules in which electrical conduits automatically reroute if they come within a certain distance of plumbing pipes. This level of automation significantly reduces the coordination efforts required later.
The benefits of clash avoidance
By focusing on clash avoidance rather than just detection, you streamline the design process, reduce the need for revisions, and enhance overall project efficiency. It’s a proactive approach that saves time and resources and fosters better collaboration among stakeholders.
Incorporating these strategies into your BIM workflow transforms clash detection from a reactive task into a proactive design philosophy, ensuring smoother project execution and improved outcomes.
The human element: Bridging technology and expertise
While BIM automation is revolutionizing construction, your expertise remains irreplaceable. Automated clash detection tools are powerful, but they need your seasoned judgment to truly make a difference.
Interpreting Clash Detection Results
Some clashes might be false positives; others could have significant implications. Your experience allows you to discern which issues need immediate attention and which can be adjusted without major concerns. This nuanced understanding ensures that the project progresses smoothly without unnecessary delays.
Anticipating Potential Clashes
Your knowledge of materials and systems enables you to foresee potential issues before they arise. For instance, understanding that certain materials expand under heat informs how you model thermal systems within the BIM environment. This proactive approach minimizes the likelihood of clashes, leading to more efficient designs.
Enhancing Collaboration
Your ability to communicate effectively with other stakeholders ensures that the insights gained from BIM are implemented correctly. By bridging the gap between technology and human expertise, you facilitate better collaboration, leading to successful project outcomes.
In essence, while BIM provides the tools, it’s your expertise that drives the project forward. The synergy between advanced technology and human insight is what truly leads to construction excellence.
Conclusion
Manual clash detection had its moment. It has served us well for years. However, it was slow, tedious and prone to mistakes. Today, the shift to BIM automation isn’t just a nice-to-have, but a necessity if you want to stay ahead of the curve.
By using tools like Revit and Navisworks, you’re not just identifying issues faster; you’re creating a smarter, more streamlined MEP design process.
The benefits are undeniable: fewer errors, fewer delays and fewer budget overruns. But more importantly, you’re fostering a collaborative environment where everyone—architects, engineers and MEP consultants—works together in a single shared model. Problems get spotted early, solutions are found quickly, and projects move forward without unnecessary drama.
Adopting BIM automation isn’t just about keeping up with technology. It’s about taking your work to the next level. It’s about delivering designs that are clean, coordinated and conflict-free—projects that save your clients time and money and earn you their trust.
At the end of the day, BIM automation handles the heavy lifting, but it’s your expertise and judgment that steers the ship. No tool—no matter how advanced—can replace your creativity and problem-solving skills. Together, you and the technology can set new standards for efficiency, quality and excellence in the built environment.
Streamline your MEP design process by automating clash detection.
Save time, reduce errors, and ensure seamless coordination.