
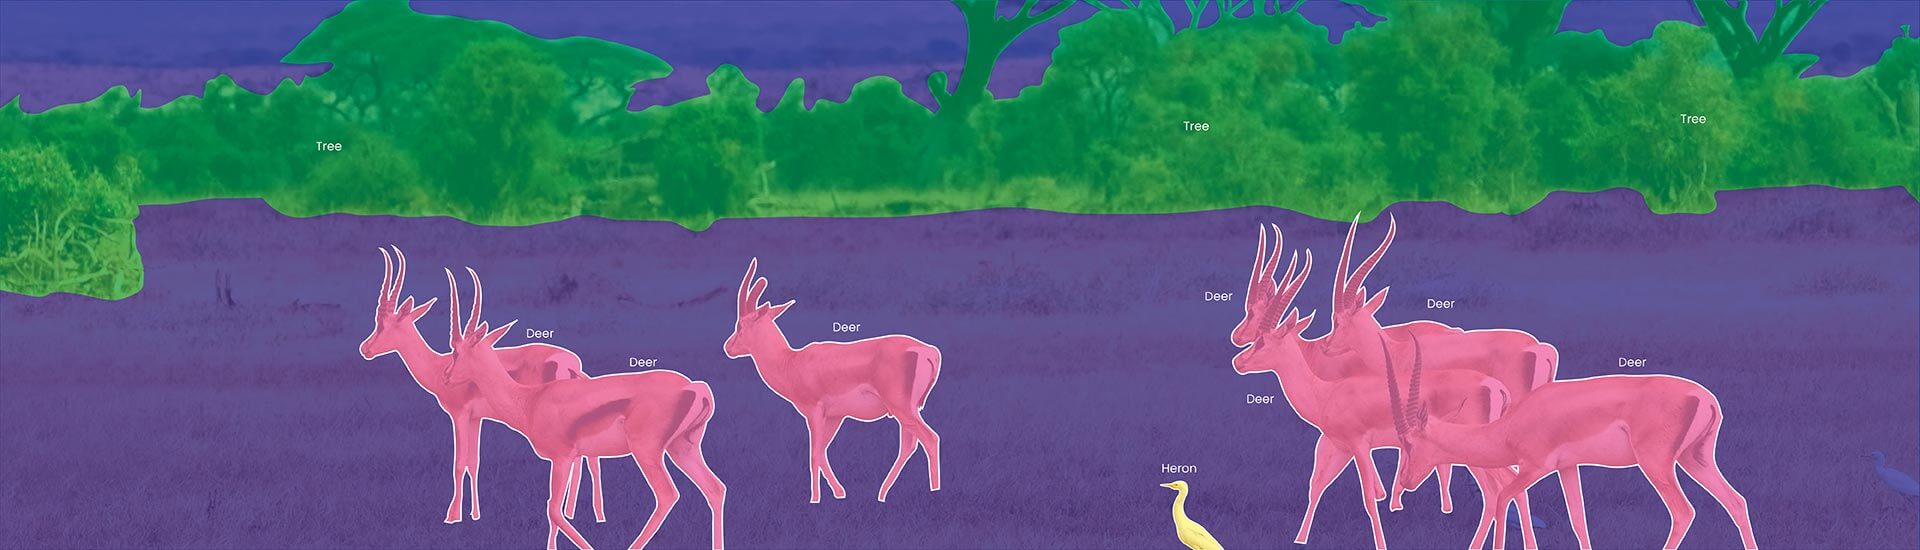

- Image annotation methods, manual, semi-automated, or model-assisted, you choose; determine the accuracy of downstream mIoU.
- Pixel level image annotation consumes 3-5X longer time compared to bounding box. SAM2, the model assisted tool, reduces that time by up to 75%.
- For reliable semantic segmentation training dataset, the six-step workflow right from data preparation to model deployment is the new normal for image annotation for semantic segmentation projects.
Introduction
Annotating images for semantic segmentation involves assigning a semantic label to each pixel. And pixel-level annotation is a herculean step in any computer vision pipeline.
An image annotator takes anywhere between 40 – 60 minutes to label a single complex urban scene correctly. Now imagine how big project constraint it is to annotate 50,000 training images with these specifications. However, the good news is that deep learning tools have evolved to change this math. Model assisted training data pipelines now bring down the annotation time by 60-80%, and that too without compromising the mask quality that segmentation models largely depend on.
In this article we will talk about image annotation decisions that matter, right from selecting the right segmentation type, to optimizing the operations with a production-grade 6-step workflow, to knowing when to outsource. The annotation frameworks and benchmarks showcased here are applicable to autonomous driving, medical imaging, satellite analysis, and any domain where pixel-accurate labels drive model performance.
Table of Contents
- Introduction
- Semantic segmentation vs. instance vs. panoptic: which type do you need?
- 4 annotation methods: time, cost, and accuracy trade-offs
- How to Annotate Images for Semantic Segmentation
- Best annotation tools for semantic segmentation: CVAT, Roboflow, and SuperAnnotate compared
- When to outsource semantic segmentation annotation
- Conclusion
Semantic segmentation vs. instance vs. panoptic: which annotation type do you need?
For creating the annotation pipeline, specify clearly that you need semantic segmentation. Using a non-relevant or incorrect segmentation type will compel you to re-annotate the entire dataset. Such a mistake can cost you weeks and a lot of dollars especially when working on large projects.
Semantic, instance, and panoptic, all three segmentation types differ on one major attribute: how precisely they classify individual objects.
| Type | What it labels | Best for | Annotation complexity |
|---|---|---|---|
| Semantic segmentation |
|
|
|
| Instance segmentation |
|
|
|
| Panoptic segmentation |
|
|
|
In a way it is very simple to decide between the three.
- Use Instance segmentation to count or track individual objects like pedestrians, cells, vehicles.
- Use Semantic segmentation to classify regions driveable surface vs. sidewalk vs. building
- Use Panoptic segmentation for data pipelines that require both above.
Production projects in all three domains mentioned here use semantic segmentation:
- Autonomous driving (road, lane, pedestrian, and vehicle classification).
- Medical imaging (organ, lesion, and anatomical boundary delineation).
- Remote sensing (land cover, infrastructure, and vegetation mapping).
Though all three domains use semantic segmentation, the annotation requirements differ widely. A medical mask requires higher boundary precision as compared to a land-cover mask. This directly affects the outcome and hence the semantic segmentation method and tool selection.
Time, cost, and accuracy trade-offs across four annotation methods
The annotation speed, label consistency, and the mIoU ceiling your model can achieve; all these depend on the method you choose for pixel labeling. Let’s check out the four annotation methods along with the time, cost and accuracy attributes of each of them:
Manual annotation
Annotators use polygon tools or brush strokes to draw boundaries. This method has proved its worth in producing the most accurate masks. The method perfectly meets the requirements of small, high-stakes datasets for medical imaging, legal forensics, and projects where creating accurate boundaries is the primary challenge. It takes 30–60 minutes to annotate every complex image, and it is unable to scale up to production volumes.
Semi-automated annotation
Annotators have to confirm and correct the boundary suggestions generated by edge detection and Superpixel algorithms. Using this annotation method cuts labeling time by 40–60% with minimal accuracy loss when masking natural images like outdoor scenes, industrial inspection footage, etc., that have strong contrast boundaries. Though faster this method is judgment intensive. Also, annotators using this method require a different annotation skill set when it comes to reviewing.
Model-assisted annotation
In this approach, a pre-trained annotation model generates candidate masks. Now the annotators job is to review, accept, reject, or refine. This is the new default norm for production projects above 1,000 images. Leveraging the SAM2 integration helps in reducing the annotation time 8-12 minutes per image. It also eliminates fully manual work by 75–80%. Quality is nowhere compromised as the entire project is executed under supervision of a trained annotator.
Synthetic data generation
Virtual environments are used to automatically generate pixel masks which are used for game engines, 3D simulators, and procedural rendering pipelines. With synthetic data annotation costs nearly zero, and the scalability is unlimited. The only challenge of working with synthetic data is the gap between simulation to real domain performance. Models trained using synthetic data perform differently when used for annotating real-world images.
Domain adaption techniques are applied to address this issue. This approach is significantly useful in bootstrapping pipelines or augmenting real labeled data. It does not come in handy as a standalone strategy.
| Method | Avg. time / image | Accuracy ceiling | When to use |
|---|---|---|---|
| Manual | 30–60 min | Highest | Small datasets, high boundary precision required |
| Semi-automated | 15–25 min | High | Mid-size datasets, strong-contrast imagery |
| Model-assisted (SAM2) | 8–12 min | High — 94% of manual mIoU | Most production projects above 1,000 images |
| Synthetic | < 2 min | Medium (sim-to-real gap) | Large-scale, controlled environments; augmentation |
Hybrid, the model-assisted annotation, is the best solution for most of the production pipelines. It is so because the approach has manual correction for edge cases like occluded objects, low-contrast boundaries, rare classes and many more. This is the approach the 6-step workflow below is built around.
How to annotate images for semantic segmentation
Autonomous driving, medical imaging, and remote sensing projects are on the rise. Considering this equation here’s a six step workflow that shows the production practices accordingly. Each step has a predefined output that compliments the next step. Expect quality problems that compound downstream if any of the step is skipped or compromised.
Step 1: Data collection and preparation
Your training datasets should have common-case scenarios, as well as edge cases that the model will encounter when deployed for production.
Class distribution is the first critical thing to take care of. The class imbalance in real-world datasets, a situation where background pixels are more than foreground object pixels, is a prominent challenge. As we all know, segmentation model trained using imbalanced training dataset will more likely learn to predict the dominant class. It will make the model achieve misleadingly high pixel accuracy, but the model will fail on rare classes. Fixing this issue will need you to do over-sampling. It means collecting more images of rare classes, augmenting existing annotations, and applying weighted loss functions during training – if required.
Pixel-mask alignment is the second critical thing to take care of. The ground truth will get corrupted due to the spatial offset between an image and its corresponding segmentation mask. Using SLIC or Felzenszwalb, as edge detection and Superpixel segmentation techniques during preprocessing helps you verify and refine boundary alignment well before actual image annotation begins.
Step 2: Initial model training
Using a model pre-trained on ImageNet is a smart move. You cannot train your models using random initialization on typical dataset sizes will do no good. It will only add training time without improving final performance.
First let’s check out the three architectures that dominate the production of semantic segmentation. Each one of them suits a different domain altogether:
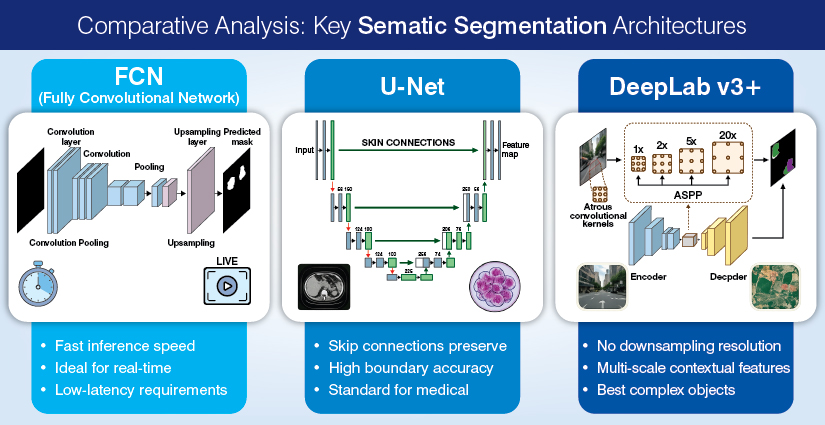
- FCN: Fast inference speed, ideal for real-time, low-latency requirements.
- U-Net: Skip connections preserve, high boundary accuracy, standard for medical.
- DeepLab v3+: No downsampling resolution, multi-scale contextual features, best complex objects.
Selecting the LOSS function will directly impact model performance while using imbalanced datasets. Cross-entropy, known for treating all pixels equally, suffices the need when using balanced datasets. In case of datasets where background pixels dominate, Dice loss directly optimizes mask overlap. For medical datasets, Dice loss outshines cross-entropy on rare-structure classes.
For all classes, mIoU should be used to measure the average overlap between predicted masks and ground truth. So, track mIoU on a held-out validation set till the time training continues. Remember, a model that has achieved 85% overall pixel accuracy, may end up scoring less than 0.50 mIoU on rare classes. Use per-class IoU to identify such failures.
Step 3: Model-assisted annotation with SAM and SAM2
Use a bounding box prompt to generate a pixel mask. This is the fastest, and high quality result providing starting point for most of the annotation projects.
Prompt-based mask generation was introduced by Meta’s Segment Anything Model – SAM 2023. You give the model a prompt, a bounding box, or a rough explanation about an object; and it will provide you with a precise segmentation mask without task-specific fine-tuning. But SAM 2024 is a smarter version, as it extends the above arrangement to videos, while maintaining mask consistency across all frames. It is effectively applied in annotating autonomous driving footage, surgical videos, and drone imagery.
SAM generates class-agnostic masks, and that is one distinction that you should consider when designing a workflow. It segments objects accurately, however, does not name them. Annotators have to generate the mask in one step and assign the class label in second step; in case they are using SAM for semantic segmentation annotation. CVAT and Roboflow, both, implement this two-step workflow natively.
SAM2 assisted annotation is known to reach 94% of fully manual mIoU in 18% of the annotation time, in one of the independent benchmark testing. SAM2 has become the favorite model-assisted approach for production pipelines due to near-equivalent quality at a fraction of the labor.
Here are the three annotation modes that you can apply depending on your project requirements:
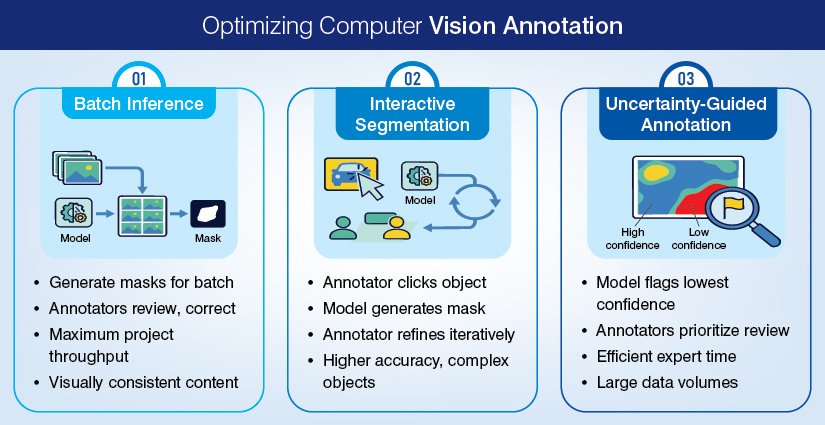
To ascertain model uncertainty, one can use Monte Carlo dropout or ensemble disagreement. Remember, regions with high uncertainty correlate strongly with ambiguous boundaries, occlusions, and rare-class instances. These are the regions that majorly impact the final mIoU.
Step 4: Active learning to reduce labeling volume
Unlabeled images are typically 15-20% of the entire dataset. Using active learning to identify and annotate these subset images can majorly contribute to model improvement. It will help you achieve 90%+ of the mIoU of training on the complete dataset.
For those who don’t know, the active learning cycle is an iterative process. It is very simple.
- Start by training an initial model using a small, labeled speed set.
- Apply the model to the unlabeled pool.
- Rank unlabeled images by informativeness with help of an acquisition function.
- Now, annotate the top ranked images.
- Add them to the training set, retrain, and repeat.
Here are the three image sampling strategies with the key characteristics and benefits of each of them:
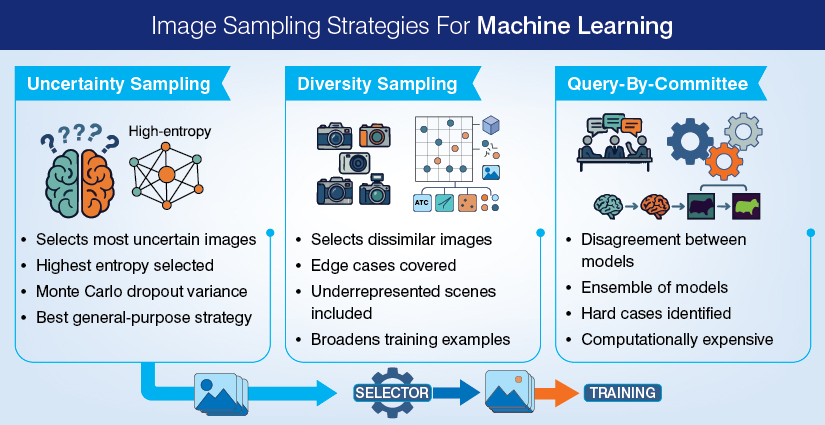
Now, let’s define the ratio of active learning value proposition. So, for example, you have an autonomous driving dataset of 50,000 images. Of which, uncertainty sampling selected 8,000 images to annotate. The resulting model attained 91% of mIoU of one trained using the entire dataset. It will also result in reduction of annotation budget by 84% and a max. of 9% quality trade-off.
Step 5: Quality assurance
A visually correct looking mask has the capacity to fail your model. Yes, you read it right. Deploy a metric-driven QA process which has pass/fail benchmarks defined before you start annotating images, and of course not after the first batch is complete.
The primary consistency metric for pixel-level annotation is Inter-annotator agreement – IAA. Use it to measure the average IoU between masks produced by individual annotators for the same image. IAA score less than 85% on boundary pixels is an indicator that there is a problem with your annotation guidelines. Mind it, that’s not an annotator skill issue. In order to fix it, revise the guidelines instead of retraining the image annotators.
Automated QA checks run before any masks enter the training pipeline:
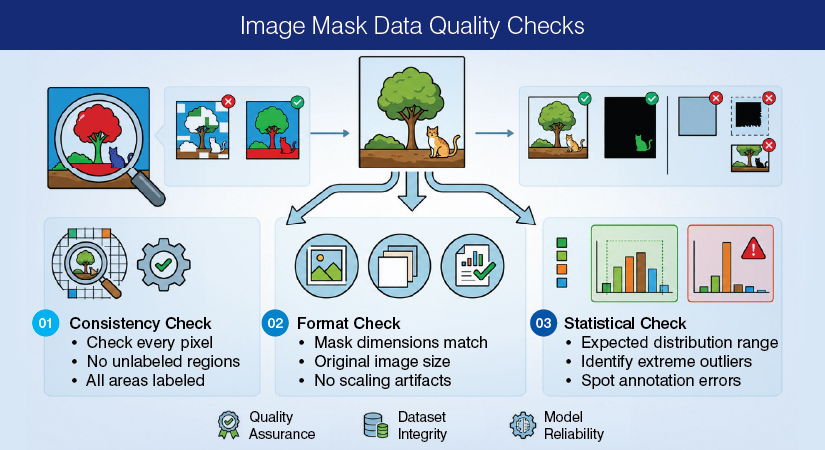
Either the mIoU on the validation set drops below the project threshold, or any class has an F1 score below 0.80. These are the two conditions that trigger human review, and both of them are capable of identifying errors in systematic annotation that missed the automated check.
Imagine your QA process discovers a failure after your team has done annotating more than 20,000 images. It will cost you more to correct it across all images if compared to building and implementing a robust QA process before you start annotating images. This is the cost reality that most of the AI teams underestimate. Be proactive in defining IAA thresholds, deploy automated check criteria, and keep a close watch on triggers in the annotation guideline document. To be on the safer side, you can run a 200-image pilot batch through the full QA stack before you scale it up for all the images.
Step 6: Final model training and deployment
Final training will optimize your images for generalization, but that does not guarantee completeness. There more chances that a model that has memorized training masks will fail miserably on production data.
Your AI teams can use hyperparameter tuning to target three different variables:
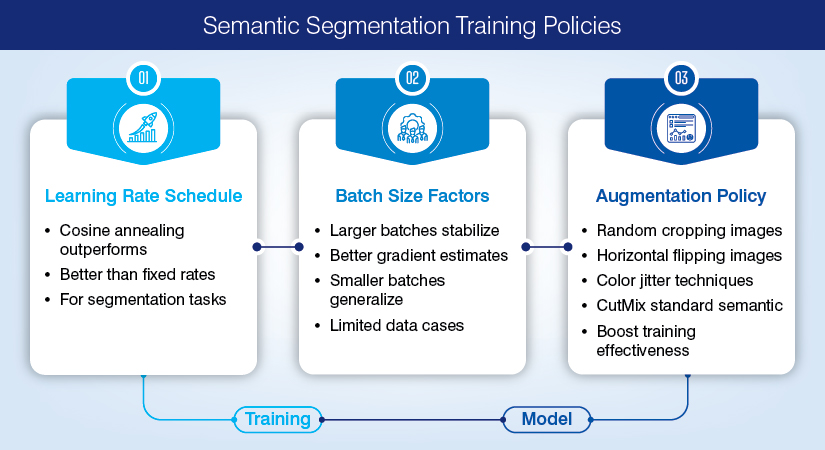
- Learning rate schedule: cosine annealing typically outperforms fixed learning rates for segmentation tasks.
- Batch size – larger batches stabilize gradient estimates; smaller batches generalize better on limited data.
- Augmentation policy – random cropping, horizontal flipping, color jitter, and CutMix are standard for semantic segmentation.
In addition, here are two architectural additions that will help your AI teams to improve final model quality when it comes to boundary-critical image annotation tasks:
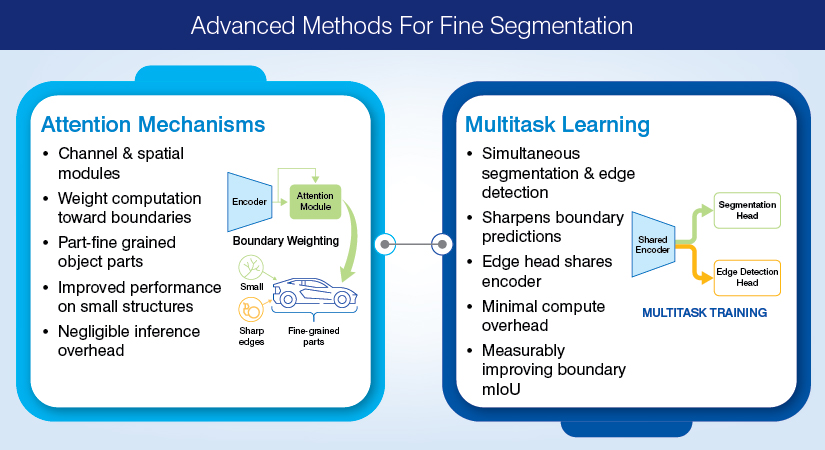
The final deployment evaluation checklist has three critical attributes:
- mIoU on the held-out test set
- Per-class IoU for rare and safety-critical classes
- Inference speed in milliseconds per frame against the production latency requirement.
The third attribute is where you get trapped in. For real-time autonomous driving, a segmentation model with 92% mIoU running at 200ms per frame will not help. Because here 30ms is the practical upper bound. Remember, latency is a constraint of first order. Evaluate it before you deploy – not afterwards.
Best annotation tools for semantic segmentation: CVAT, Roboflow, and SuperAnnotate compared
Selecting the best annotation tool for semantic segmentation depends largely on the method you opt for annotating images. The tool you select for annotation also determines annotator throughput, compatibility of export formats, and also how well you will be able to integrate model-assisted workflows in your training pipeline.
| Tool | Best for | Export formats | DL integration | Cost |
|---|---|---|---|---|
| CVAT |
|
|
|
|
| Roboflow |
|
|
|
|
| Super Annotate |
|
|
|
|
All said and done with the tool comparison. However, the most important element before you start is “format compatibility”. Check out the formats that each tool can export your training data in the framework your project demands. See if the tool supports COCO JSON for most PyTorch pipelines, Pascal VOC XML for TensorFlow legacy projects, TFRecords for TF2+. Imagine the costly affair it will get if you discover a format mismatch after your team has annotated 10, 000+ images. It will be huge.
Depending completely on annotation tools comes with its own set of challenges. You will need skilled human effort, quality control, and workflow management. However, outsourcing image annotation for semantic segmentation will prove to be a smart move. Trained annotators, standardized processes, and robust QA frameworks that ensure pixel-level accuracy at scale is what they bring to table for you. Outsourcing will reduce your overhead of hiring, training, and managing in-house teams, and empower you to focus on model development and deployment. Let’s take a dive to find out when should you outsource semantic segmentation annotation.
When to outsource semantic segmentation annotation
Your in-house teams can annotate few hundred to few thousand images for semantic segmentation, but as a pilot project. What if along with annotating images in bulk you are required to achieve throughput consistency, annotator turnover, and incur QA overhead?
Outsourcing image annotation for semantic segmentation makes sense when any of the following apply:
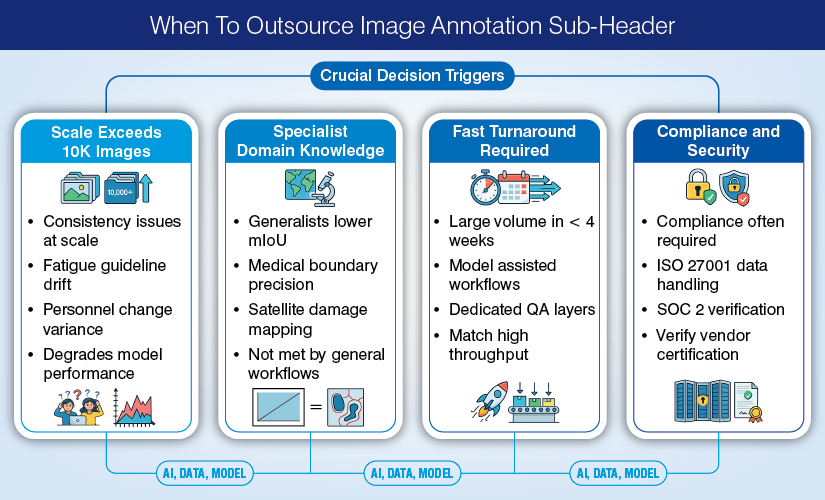
Once you decide to outsource, it’s time for vendor section. Vendor selection is the process which can make or break your project. So before shortlisting a vendor, ask them these five questions:
- What is your inter-annotator agreement benchmark for pixel-level masks?
- How do you measure inter-annotator agreement benchmark for pixel-level masks?
- Which annotation platform do you use?
- Does your annotation platform support model-assisted annotation with SAM2?
- Can you provide per-class IoU results from a comparable project in the same domain?
Question three and four are the most revealing. An image annotation service provider who has produced per-class IoU results in their past projects will be able to tell the difference between overall pixel accuracy, easy to inflate, and per-class segmentation quality. That’s exactly what your model actually depends on.
One of the leading image annotation service provider from India used polygon annotation to annotate more than 1.2 million images with 98%+ inter-annotator agreement. They used CVAT with custom guidelines across 47 apparel sub-categories. The annotated datasets were used to train a visual search model for a California-based technology company. Read complete Project details here.
FAQ: semantic segmentation annotation
What is the difference between semantic and instance segmentation?
There is a stark difference between semantic segmentation and instance segmentation. semantic segmentation treats all objects of the same class as one group but assigns every pixel a class label. So, in a given scenario, it will label” Car” to two cars that appear in a single frame but will not distinguish them from each other. On other hand, instance segmentation assigns a unique ID and a class to each individual object. Using semantic segmentation for understanding regions, whereas using instance segmentation for counting or tracking individual objects is a smart move.
Which deep learning model is best for semantic segmentation?
Which deep learning model is best for semantic segmentation depends largely on the domain it is to be used for. If you want to skip connections to preserve fine boundary details for small datasets of high-resolution medical images, working with U-Net works fine. If you want to handle urban and satellite scenes with multi-scale context, and microstructure is secondary, working with DeepLab v3+ is suggested. All said and done, SAM2 is the most preferred and efficient ways to generate high-quality mask candidates across domains.
How long does it take to annotate images for semantic segmentation?
Time taken to annotate images for semantic segmentation depends on the type of images and how you are planning to annotate them. Manual annotation consumes anywhere between 30-60 minutes per image. Model assisted annotation with SAM2 will reduce that time to nearly 8-12 minutes per image. Using fully automated annotation pipeline will not take more than 2 minutes per image to annotate high-contrast imagery with human QA review.
What annotation format does CVAT export for semantic segmentation?
The annotation format that CVAT exports for semantic segmentation are COCO JSON, Pascal VOC XML, Cityscapes format, TFRecords, and several others. Said that, COCO JSON is preferred by most PyTorch-based segmentation pipelines. For you should verify the training framework before you start annotating. As you know, converting formats after images are labeled adds unwarranted dollars and time to the overall project.
Can SAM be used for semantic segmentation annotation?
Yes. SAM can be used for semantic segmentation annotation, but remember, SAM generates class-agnostic masks. It segments objects without naming them. For using it for semantic segmentation tell your annotators to generate the mask with SAM and then assign the class label separately. CVAT and Roboflow both have this inbuild two-step workflow. It fast-tracks mask generation and mandates judgement by experienced annotator. The process cannot be automated.
Conclusion
For semantic segmentation, resources are a bigger challenge than technicalities. The quality and consistency of masks matter more than the model architecture you select. You will not be able to recover lost mIoU by using any amount of hyperparameter if you select the wrong annotation method or skip implementing a structured QA process.
Method selection, IAA thresholds, and active learning strategy are some of the decision that you should make early on as they determine project outcomes.SAM-2 assisted annotation with guided QA is the production standard for annotation projects that have 1,000+ images. Manual annotation still reigns the precision benchmark for projects with images lesser than that.
Correcting annotation errors on bulk images will cost you more than preventing them. Build the right pipeline first from inception.
Protect Your Portfolio from Hidden Foreclosure Trends
Partner with Hitech for clean, aggregated, validated foreclosure data.